Introduction
This section provides a structured reference for integrating the Saphere Scan widget into your application. Whether you're working on a web platform or a mobile environment, Saphere Scan offers a consistent API surface and lightweight deployment.
Integration Overview
- Web: Embed the widget into any HTML page using the CDN script.
- React Native: Use a local HTML file rendered inside a WebView.
- Ionic: Integrate similarly to React Native via WebView.
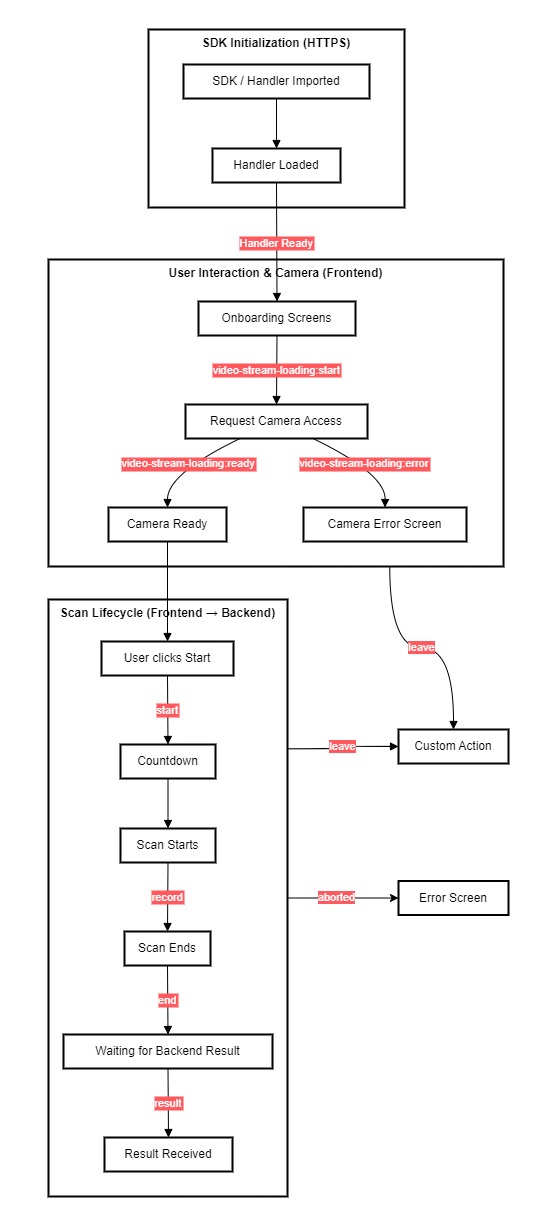
Communication Flow Summary
Below is a high-level sequence diagram that illustrates the communication between the Saphere Scan widget on the frontend and the Saphere Core backend:

Integration Handler
The Handler object is the primary interface for mounting, unmounting, and configuring the Saphere Scan widget.
interface Handler {
  load: (container: string | HTMLDivElement, options: Options) => void;
  destroy: () => Promise<void>;
  langs: Lang[];
}
Properties
load(container, options)
- Mounts the widget in the provided container.
- container: Either a CSS selector string or a
HTMLDivElement. - options: A configuration object (see
Optionsreference). - Example:
Handler.load("#container", options);
destroy()
- Asynchronously unmounts and removes the widget from the DOM.
- Returns a
Promise<void>that resolves once the widget is cleaned up. - Example:
await Handler.destroy();
langs
- Returns an array of available language codes supported by the widget.
- Example output:
["ar", "de", "en", "es", "fr", "it", "pl", "pt", "pt_BR", "tr"]
Integration Options
Full Options Reference
The full configuration object passed to Handler.load() looks like this:
interface Options {
  createMeasure: CreateMeasureOptions;
  onEvent?: (event: Event) => Promise<boolean | undefined>;
  allowLeave?: boolean;
  lang?: string;
  pages?: PageOptions
}
createMeasure(required): Defines how the measure is created (delegateorhandlestrategy).onEvent: Callback that listens to events during the scan (start, result, aborted, etc.).allowLeave: Show/hide the "Leave" button in the widget.lang: Set the default language (en,fr,es, etc.).pages: specify which pages to display or not.
Create a measure
You can create a measure using one of two strategies:
Delegate Strategy (recommended)
Use this strategy to delegate the retrieval of the measurement to the widget. You must provide an authenticated endpoint (e.g., via an API key or token). The widget will make a POST request to that URL to create a new measurement.
Delegate: Most common approach; widget willPOSTto a secure URL on your backend to create a measure.
createMeasure: {
  strategy: "delegate",
  url: "https://api.test.saphere.ai/measures",
  headers: { Authorization: `Bearer <YOUR_API_KEY>` }
}
This approach is fast and secure but requires proper access control on your backend.
Handle Strategy (advanced/custom logic)
Instead of calling a remote URL, you provide a function (fetch) that is responsible for returning a new measurement ID. This is useful if you want to run custom checks or workflows before the scan starts.
Handle: Advanced control; your frontend provides afetch()function returning a measure object.
createMeasure: {
  strategy: "handle",
  fetch: async (options: FetchOptions) => {
    // custom logic here
    return { id: "...", ... }
  }
}
Sell also FetchOptions
Event Handling Overview
The Saphere Scan widget is designed around an event-driven integration model.
Rather than exposing imperative APIs, the widget communicates its internal state, user interactions, and backend outcomes exclusively through events.
Integrators are expected to listen to these events and react accordingly—whether to update their UI, persist results, handle errors, or control navigation in the host application.
How Events Are Emitted
There are two distinct event channels:
- SDK lifecycle events, emitted as
DOMevents (e.g.Handler Ready) - Widget runtime events, delivered through the
onEventcallback
Only runtime events appear in the onEvent stream. SDK lifecycle signals must be handled separately using window.addEventListener.
Understanding the Event Flow
The diagram below illustrates the complete lifecycle of the widget, from SDK initialization to scan completion.
It is organized around:
- A single vertical main flow, representing the normal scan lifecycle
- Side deviations, representing early exits (
leave) and terminal failures (aborted) - A clear separation between frontend-controlled phases and backend-controlled processing
Events Reference
This section describes all events emitted by the Saphere Scan, how they are delivered, when they may occur, and how integrators should interpret them.
Event Channels Overview
There are two distinct event channels in the SDK.
SDK Lifecycle Events (DOM Events)
Some lifecycle signals belong to SDK initialization, not widget execution.
These are emitted as DOM events on window and are not delivered through onEvent.
Widget Runtime Events (onEvent)
All widget behavior (camera, scan lifecycle, results, failures) is reported through the onEvent callback.
type OnEventOptions = (event: Event) => Promise<boolean | void>SDK Lifecycle Event (DOM)
⚡ Handler Ready
- Delivery
- DOM event (
window.addEventListener) - ❌ Not available in onEvent
window.addEventListener("handler-ready", () => {
	// Saphere Scan widget is ready
})
When
- SDK script is loaded
- Internal handlers are initialized
Guarantees
- The widget can now be mounted
- Runtime events may now be emitted
⚡ video-stream-loading:start
{
  type: "video-stream-loading",
  status: "start"
}
Meaning
- The widget is requesting camera access
- The browser permission prompt may appear
video-stream-loading:ready
{
  type: "video-stream-loading",
  status: "ready"
}
Meaning
- Camera access is granted
- The video stream is usable
- The user may start a scan
⚡ video-stream-loading:error
{
  type: "video-stream-loading",
  status: "error",
  reason
}
Meaning
- Camera access failed
- A scan cannot be started
Possible reasons
deniedno-devicealready-usednot-supported
Scan Lifecycle Events (onEvent)
Scan lifecycle events represent the main execution flow from user interaction to backend processing.
⚡ start
{ type: "start" }
When
- The user clicks the “Start” button
Guarantees
- A scan workflow has started
Does NOT guarantee
- That the scan will succeed
⚡ record
{ type: "record" }
When
- Video capture effectively begins
Meaning
- Signal acquisition is running
- User stability is required
- A measure exists
⚡ end
{ type: "end" }
When
- Video capture finishes
Important
- This does not indicate success
- The scan may still be aborted afterward
- The widget may still be sending buffered data
- The backend will start computation only after receiving the full dataset
- This event marks the end of capture, not the end of data transmission
⚡ result (Terminal Success)
{
  type: "result",
  id,
  variables
}
When
- Backend processing completed successfully
Guarantees
- The scan exists and is persisted
- This is the only success signalNo further scan events will follow
Deviation Events (onEvent)
Deviation events represent early exits or failures and are not part of the normal scan flow.
⚡ leave — User Exit
{ type: "leave" }
When
- The user explicitly clicks the “Leave” button
- Can occur any time after Handler Ready
Semantics
- A scan may or may not exist
- This is not an error
- The widget is intentionally exited
Typical usage
- Close widget
- Restore host application UI
- Trigger custom navigation
⚡ aborted — Scan Failure
{
  type: "aborted",
  reasons
}
When
- A scan has started
- The scan terminates before a result is produced
Can occur
- During countdown
- During scan
- After
end, while waiting for backend processing
Guarantees
- No result will ever be emitted
- The scan does not exist
- A restart is required
Abort Reasons
Abort reasons explain why the scan could not complete.
They are terminal and always require a restart.
User & Interaction Abort Reasons
-
FOCUS_LOST: Page or tab lost focus -
WIDGET_RESIZED: The widget has been resized during the capture process -
CANCELED_WHILE_COUNTDOWN: The user clicked on the cancel button during the countdown step -
CANCELED_WHILE_CAPTURING: The user clicked on the cancel button during the capturing step -
CANCELED_WHILE_SENDING: The user clicked on the cancel button during the sending step -
CANCELED_WHILE_PROCESSING: User canceled during backend processing -
COMPONENT_UNMOUNTED: Widget removed from DOM
Technical Abort Reasons
-
CONNECTION_ERROR: Network failure -
UNEXPECTED_WS_CLOSED: Connection with backend unexpectedly closed -
UNEXPECTED_WS_RESULT: Invalid backend response -
CREATE_MEASURE_ERROR: Measure creation failed -
VIDEO_SOURCE_ENDED: Camera stream ended unexpectedly
Early Conformity Abort Reasons
-
CONFORMITY_POOR_LIGHT: Lighting insufficient -
CONFORMITY_LOW_FPS: Frame rate too low -
CONFORMITY_FACE_PRESENCE: Face not detected -
CONFORMITY_MUCH_VARIATIONS: Excessive movement
Result Interpretation & Backend Errors
Receiving a result event means the scan completed, but not all variables are guaranteed to be valid.
Variable-Level Result Model
Each variable follows this structure:
type VariableValue =
  | { value: ValueType; error: null }
  | { value: null; error: Conformitie | ConformitieBp }
This allows partial success.
Conformity Errors in Results
- Conformity errors indicate data quality issues, not scan failure
-
CONFORMITY_POOR_LIGHT: Insufficient light -
CONFORMITY_LOW_FPS: The device is too slow to process the capture -
CONFORMITY_FACE_PRESENCE: Face is lost -
CONFORMITY_MISSING_SIGNAL: Physiological signal is missing -
CONFORMITY_FACE_SIZE: Face too small -
CONFORMITY_INITIALISATION:
Input & Business Errors
-
MISSING_USER_DATA_*: Required user data missing -
CREDIT_EXCEEDED: Account limit reached
Languages
The widget supports multiple languages. Use the lang option to enforce a default:
lang: "en" // or "fr", "de", "pt", etc.Available values: ar, de, en, es, fr, it, pl, pt, pt_BR, tr
User Data Input Options
Some physiological variables (e.g., BMI from face Scan, cardiovascular health score, high blood pressure risk) require additional user context like age, sex, weight, height, or smoking status. The widget supports two integration modes to handle this information:
1. Programmatic Injection (userData via FetchOptions)
If you already collect user data in your application (e.g., from a sign-up form or user profile), you can inject it directly when creating a measure.
Example:
createMeasure: {
  strategy: "handle",
  fetch: async (options) => {
    console.log(options.userData) // auto-populated if using form, or inject it yourself

    return await createMeasureInBackend({
      userData: {
        age: 30,
        sex: "M",
        weight: 72,
        height: 178,
        smokingStatus: "non-smoker"
      }
    });
  }
}
This approach gives you full control over the user experience and data validation. You must ensure all required fields are present to prevent aborted scans due to MISSING_USER_DATA_* errors.
2. UI-Based Collection (via User Data Form)
The User Data Form allows collecting user metadata directly through the Saphere UI before a measurement.
This form is activated and configured through the pages field of the loading (or integration) Options object.
Enabling the User Data Form
To enable the User Data Form, define a pages.validates configuration in load(or integration) options.
The form page can be configured to show or hide specific form fields.
Example configuration
"pages": {
  "validates": {
    "3": {
      "ignore": false,
      "fields": {
        "height": { "ignore": false },
        "weight": { "ignore": false },
        "age": { "ignore": false },
        "sex": { "ignore": false },
        "smokingStatus": { "ignore": false },
        "externalId": { "ignore": false }
      }
    }
  }
}
Configuration behavior
- Each key under validates represents a UI page index
- Setting ignore: false on a page activates the User Data Form for that page
- Each field can be individually controlled using its own ignore flag
Field visibility control
Clients can choose which form fields are displayed by toggling their ignore value:
-
height: User height -
weight: User weight -
age: User age -
sex: User sex -
smokingStatus: User smoking status -
externalId: Client-defined external identifier
Notes
Note
"age": { "ignore": true }The field will not be shown in the User Data Form.
Note
At least one field must be enabled (ignore: false) for the User Data Form to be displayed.
Once enabled:
- The form will be shown before measurement begins
- The widget will validate the inputs
- The form-submitted
userDatawill:- Be passed to your
fetch()function (if usinghandlestrategy) - Be included in the POST body (if using
delegatestrategy)
- Be passed to your
🔐 Note: You're still responsible for using the collected data to create the measure on the backend.
👉 See also Metrics Dependencies Overview.
👉 See also how to Create and Apply Customization.
FetchOptions Reference
When using the "handle" strategy in createMeasure, your custom fetch() function receives a FetchOptions object. This object lets the widget pass relevant user context and requested variables.
interface FetchOptions {
  userData?: UserData;
  desiredVariables?: Variable[];
  unwantedVariables?: Variable[];
}
Fields
userData (optional)
Contains user-specific information such as:
interface UserData {
    externalId?: string
    age?: number;
    sex?: "M" | "F";
    weight?: number;
    height?: number;
    smokingStatus?: "smoker" | "non-smoker";
}📌Note: These values depend on how you configure the user data form (or feed data manually).
externalId (optional)
Type: string
A client-defined identifier used to associate a Saphere request or result with an external system, user, or business context.
The value is stored and returned unchanged by the Saphere API and can be used to correlate Saphere resources with client-side data or workflows.
Use cases
- Link measurements or analyses to internal user IDs
- Track requests across distributed systems
- Simplify reconciliation, logging, or debugging
Example
{
  "externalId": "user-12345-abcde-6789"
}
👉 See also Metrics Dependencies Overview.
desiredVariables (optional)
An array of variables that the client wants to compute (e.g., ["hr", "br", "faceBmi"]). Use this to restrict or validate what’s computed server-side.
By default, all variables included in your subscription are automatically calculated.
You can refine this selection using the desiredVariables (variables you want) and unwantedVariables (variables to exclude) parameters.
👉 See also Available Metrics
unwantedVariables (optional)
Same as above, but for excluding variables explicitly. If you receive both desiredVariables and unwantedVariables, desiredVariables takes precedence.
Example usage
fetch: async (options: FetchOptions) => {
  console.log("User wants:", options.desiredVariables);
  console.log("User data:", options.userData);
  const res = await fetch("/api/create-measure", {
    method: "POST",
    body: JSON.stringify(options),
    headers: { "Content-Type": "application/json" }
  });
  return await res.json(); // Must return a valid CreatedMeasureDTO
}
📌Note: If you fill both desiredVariables and unwantedVariables, desiredVariables takes precedence.
Create Your Proxy
To use the widget in delegate mode, your application must expose a server-side proxy that securely handles the creation of measurement sessions.
This proxy acts as an intermediary between the Saphere Scan frontend and the Saphere Core backend, enabling secure authentication and control over who can start a scan.

Why a Proxy?
- The frontend (e.g. browser) should never expose API keys directly.
- The widget needs to retrieve a measurement token before it can open a WebSocket.
- Your backend will handle authentication and access control before requesting the token from Saphere Core.
Expected Proxy Behavior
Your backend must implement an HTTP endpoint that accepts the measurement request. It should forward the request to the official Saphere Core API, adding the required headers:
POST /api/my-measure-proxy
Authorization: Bearer <your-backend-token>
Content-Type: application/json

{
  "userData": {
    "age": 30,
    "height": 175,
    "weight": 68,
    "sex": "M"
  },
  "desiredVariables": ["hr", "hrv", "bpClass"]
}
This endpoint will forward the request to:
POST https://api.test.saphere.ai/measuresAnd return the CreatedMeasureDTO object to the widget.
Proxy Benefits
- Protects your credentials
- Allows custom validation and logging
- Enables quota and user tracking
- Keeps your frontend lightweight and secure
📌 Note: If you're using the handle strategy instead of delegate, your proxy is implemented directly inside your frontend logic using a fetch() function.